
 A
few simple tools and a little patience can yield some satisfying results. Most
of what you'll use you probably already have around the house. Sissors,
clothes pins, sandpaper, ruler (straight edge) single edged razor blade,
pencile and assorted glues.
A
few simple tools and a little patience can yield some satisfying results. Most
of what you'll use you probably already have around the house. Sissors,
clothes pins, sandpaper, ruler (straight edge) single edged razor blade,
pencile and assorted glues.
The only not so common item is a circular razor wheel made
for cutting fabric. It works great on paper and balsa wood as well, and sort
of simulates cutting out your parts with a circular saw.

How you get to your developed panels is up to you. You can
play directly with cardstock and sissors if you like. Than transfer that to
graph paper to create offsets for lofting your full sized boat. If you already
have some offsets you can draw them to scale on graph paper and make xerox
copies of them, or enter them into a CAD program like TurboCad, and connect
the dots with a spline curve. Or if you are using hulls software as I was in
this example you can do a screen save on the nesting portion. Open the ply
layout image in any graphic view program and print onto card stock. If you
don't have any cardstock handy, file folders are a good weight for the paper
models as well.
 Here's
the screen shot I did for my One Sheet Flat Iron Skiff.
Here's
the screen shot I did for my One Sheet Flat Iron Skiff.
 Cut out your parts and tape them together.
If this inspires you to tweak your design, do so and make another paper model
until you like what you see. Now use the paper pieces as patterns to cut out
your balsa wood. Trace them onto your balsa wood sheet and cut them out with a
razor blade or wheel. Some like to use a scale of 3/4 inch to the foot as this
allows 1/16" to equal an inch. I tend to just print my patterns as large
as I can fit onto the card stock I have, and leave it at that. The wood pieces
become a kind of kit. I like to simulate the construction technique if
possible. Hot melt glue simulates epoxy fillets in stitch and glue. Otherwise
I try to make all wood parts that the full size boat will require. Much can be
learned about assembly this way, when changes are easier to make, and less
costly.
 In
spite of what I just said, rather than make the stem post, I cheated and used
hot melt, even though this boat is not destined to be a stitch and glue. I
taped the ends of the sides together and then while holding them at the
designed angle, I applied the hot melt.
In
spite of what I just said, rather than make the stem post, I cheated and used
hot melt, even though this boat is not destined to be a stitch and glue. I
taped the ends of the sides together and then while holding them at the
designed angle, I applied the hot melt.
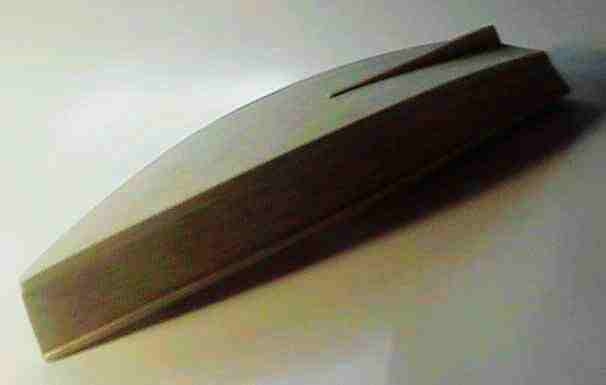
 Here
are the main parts of the boat, sides transom and middle frame.
Here
are the main parts of the boat, sides transom and middle frame.
 A
rubber band and a bamboo skewer make a fine "Spanish windless."
Notice I chose to use a solid frame instead of the stick and gusset one, for
the bending stage.
A
rubber band and a bamboo skewer make a fine "Spanish windless."
Notice I chose to use a solid frame instead of the stick and gusset one, for
the bending stage.
 Here
are the sides and transom glued together.
Here
are the sides and transom glued together.
 Here
the gunwales are being glued on. (On the full size boat, slices of PVC
pipe work wonderfully as clamps.)
Here
the gunwales are being glued on. (On the full size boat, slices of PVC
pipe work wonderfully as clamps.)
 Boats
Boats


 A
rubber band and a bamboo skewer make a fine "Spanish windless."
Notice I chose to use a solid frame instead of the stick and gusset one, for
the bending stage.
A
rubber band and a bamboo skewer make a fine "Spanish windless."
Notice I chose to use a solid frame instead of the stick and gusset one, for
the bending stage. Here
are the sides and transom glued together.
Here
are the sides and transom glued together. Here
the gunwales are being glued on. (On the full size boat, slices of PVC
pipe work wonderfully as clamps.)
Here
the gunwales are being glued on. (On the full size boat, slices of PVC
pipe work wonderfully as clamps.) The
chine logs go on next.
The
chine logs go on next.


 Seats
and deck are glued in place.
Seats
and deck are glued in place.